[목차]
1) 앞으로 배울 내용
2) 웹 브라우저 작동 원리
3) 코딩 환경 세팅
4) html 기초
5) 로그인 페이지 만들어보기
6) CSS 기초
7) 자주 쓰는 CSS 1
8) 자주 쓰는 CSS 1
9) [구글 폰트] 잘 가져다 쓰기
10) [부트 스트랩] 잘 가져다 쓰기
11) [추억 앨범] 프로젝트1
12) [추억 앨범] 프로젝트2
1. 앞으로 배울 내용
웹은 개발의 기초라고 할 수 있다.
- 1주차 : HTML, CSS, Bootstrp
- HTML 과 CSS 에 대해서 배울것이다
- 브라우저에서 우리 눈에 보이는 웹의 뼈대를 만들 수 있다!
- 웹을 쉽게 꾸밀 수 있는 부트스트랩도 활용해보자
- 2주차 : Bootstrap, Javascript
- 자바스크립트를 통해서 웹을 움직이게 만든다
- 자바스크립트를 배우면, 요청해서 받아온 데이터를 브라우저에 붙여 보여줄 수 있다
- HTML 파일이나 데이터가 바뀔 때마다 맞는 데이터를 보야줘야겠죠?
- 주로 배울 내용은 Javascript에요!!!
- 3주차 : JQuery, fetch
- 4주차 : firebase project 1
- 5주차 : firebase project 2, Gtihub, Python
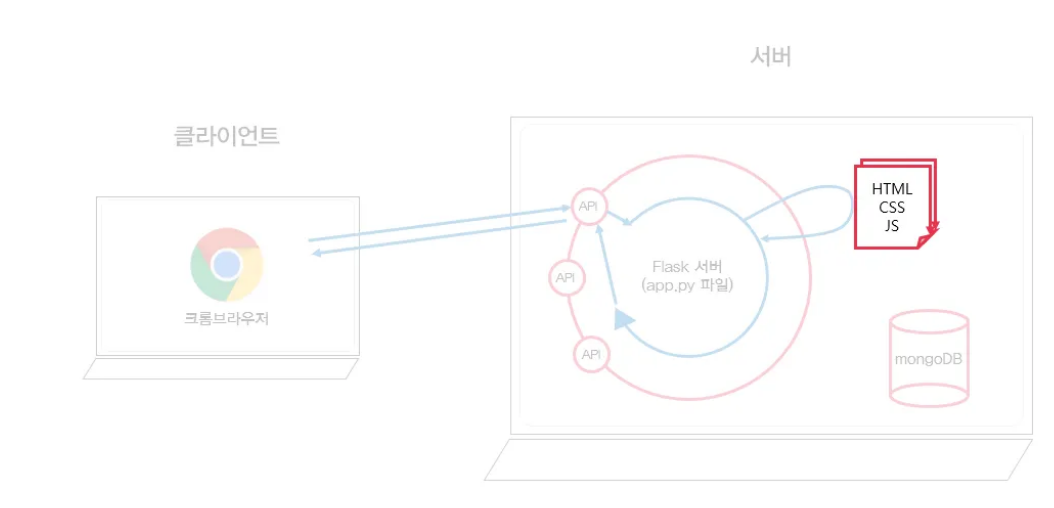
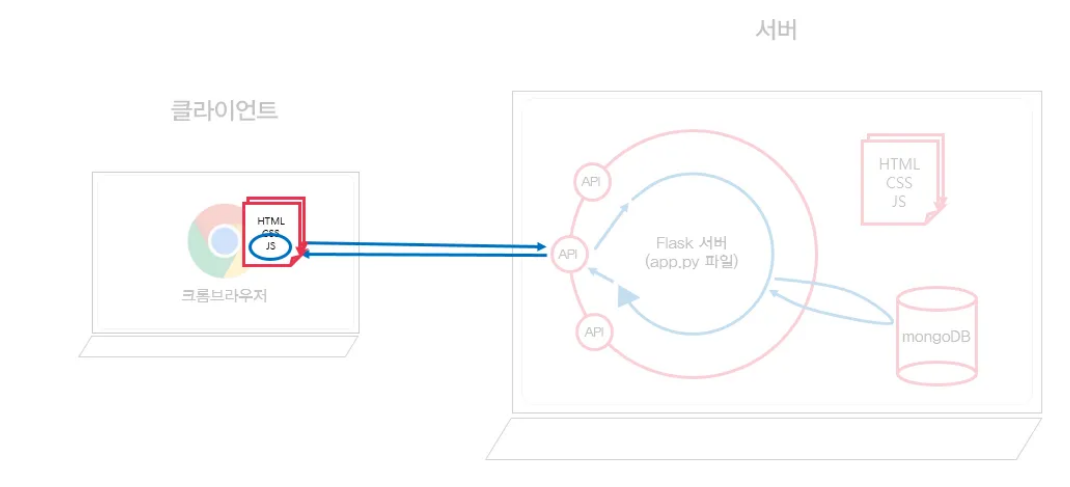
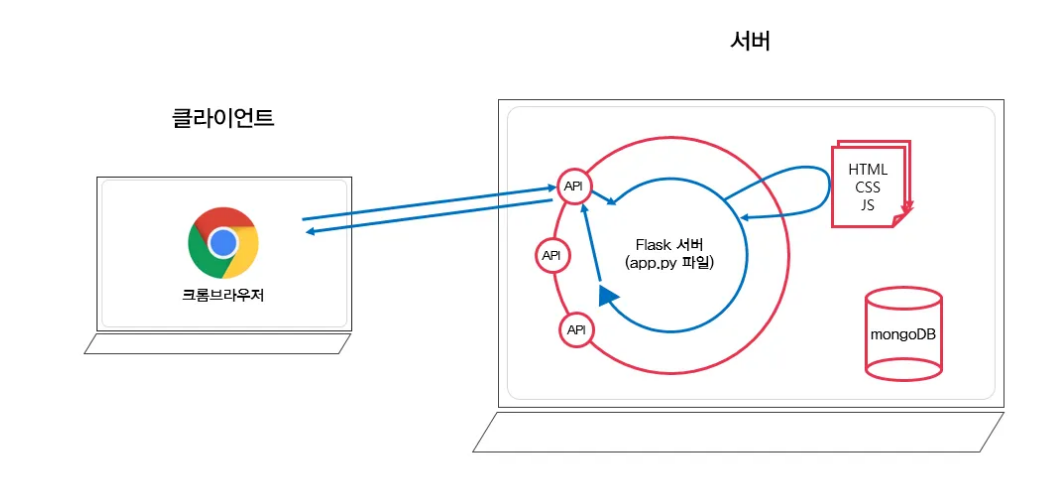
2. 웹 브라우저 작동 원리
웹의 동작 개념에 대해 배워 보자
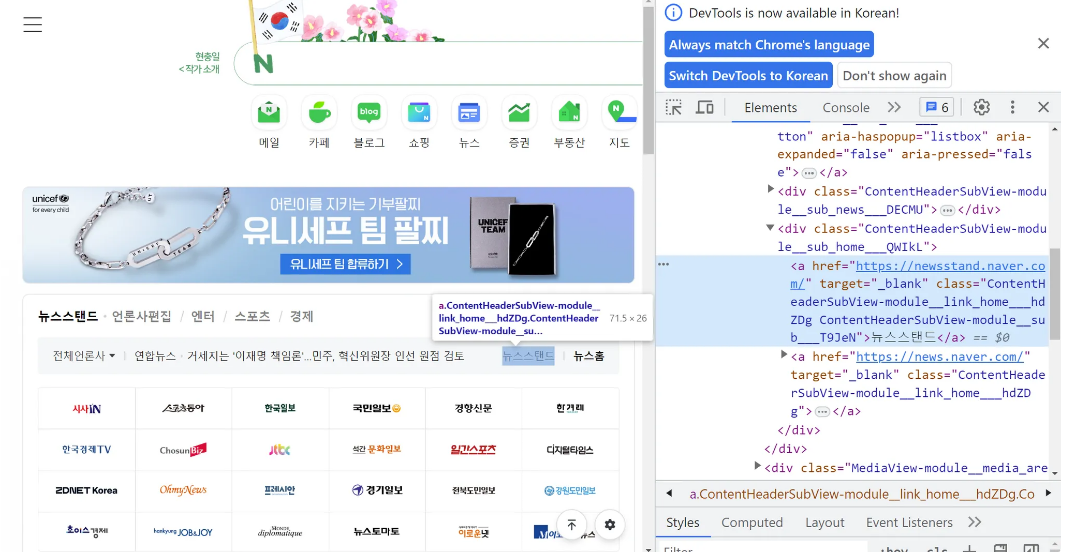
- 네이버로 접속하고 뉴스 스탠드 라는 곳을 내가 원하는 글씨로 바꿔볼게요!
- 뉴스스탠드 부분에 마우스 우클릭을 누르고 검사 탭을 열어보자
- 웹의 동작 개념
- 브라우저의 역할은 1. 요청을 보내고 2. 받은 HTML 파일을 그려주는 것이다.
- 요청은 어디에서 하나요?
- 서버가 만들어 놓은 API 라는 창구에 미리 정해진 약속대로 요청을 보내는것이다.
주소창에 주소를 입력하고 엔터를 입력하는 방식으로 말이다.
- 서버가 만들어 놓은 API 라는 창구에 미리 정해진 약속대로 요청을 보내는것이다.
- 우리가 보는 브라우저는 주소를 통해 API로 요청을 보내고, API는 요청에 맞는 HTML 파일을 돌려주고
브라우저는 받은 것을 화면에 그려준다!
3. 코딩 환경 세팅하기
개발 환경 세팅해보기
- VS Code 설치
- Open In Browser 설치
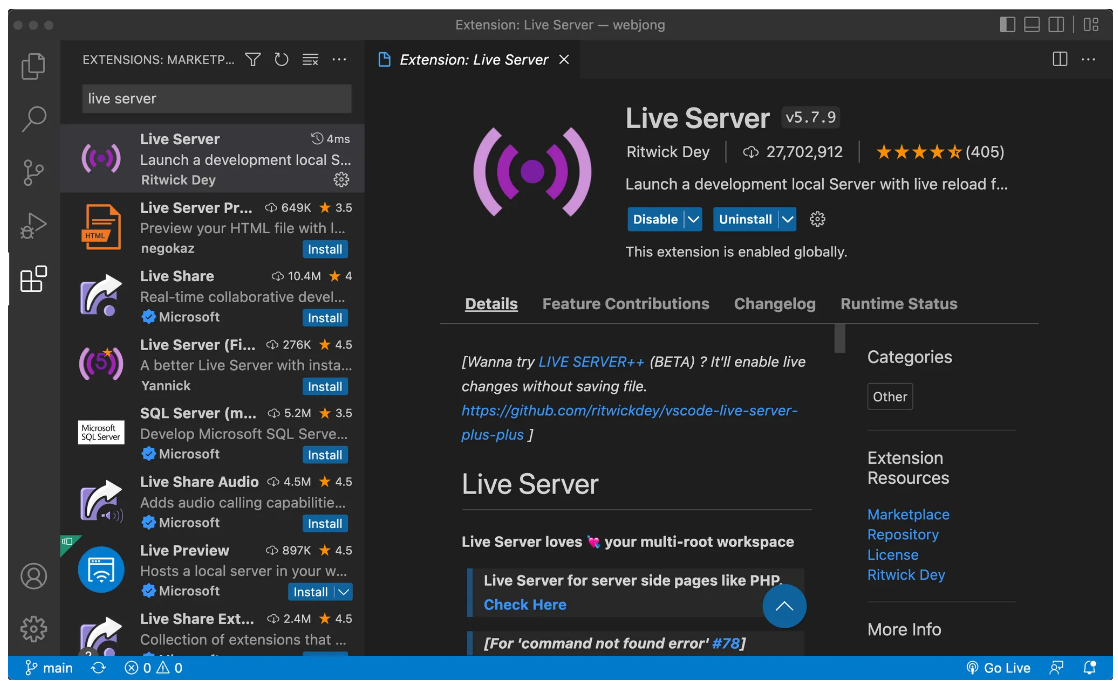
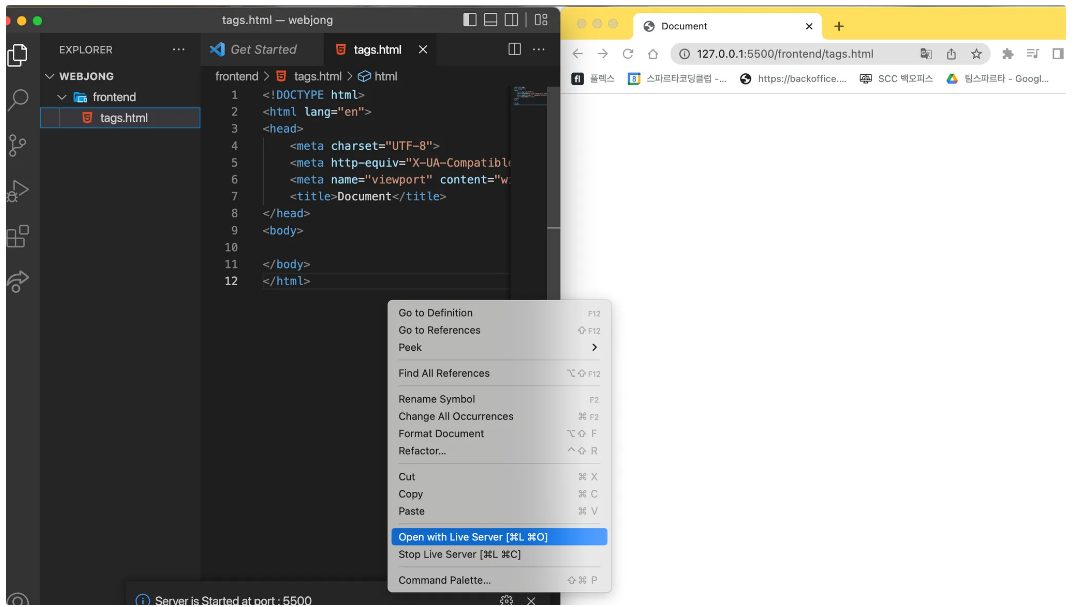
- VS Code를 실행해서 화면 왼쪽의 퍼즐 모양을 클릭해보자
- 검색창에 'live server' 라고 검색하고 설치하자
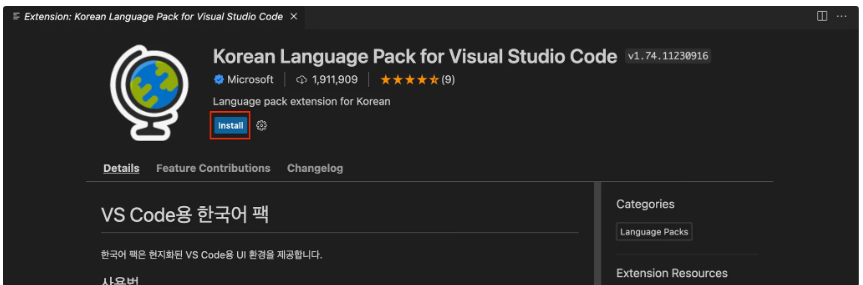
- VS Code 한국어 팩 설치
- 퍼즐조각(extensions) 클릭
- korean 이라고 치기
- Korean Language 라고 시작하는 지구본 설치
4. HTML 기초
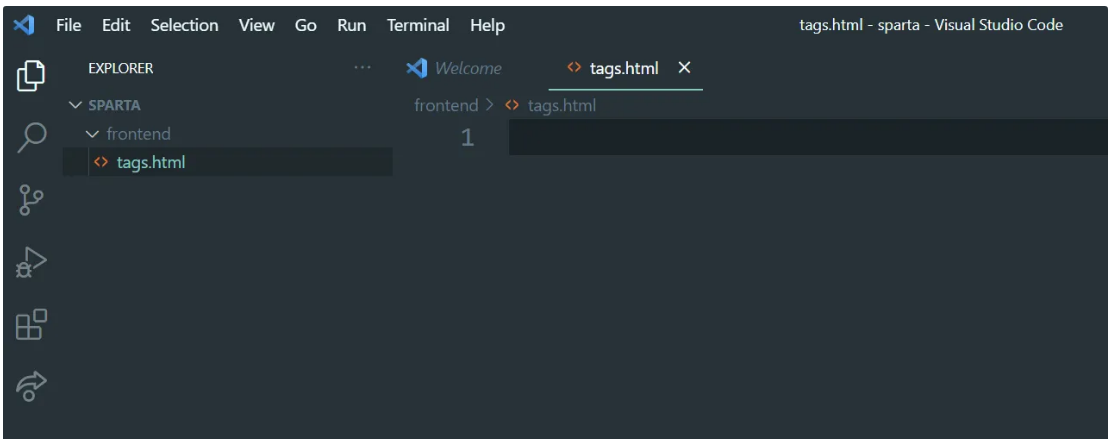
HTML 시작을 위해 바탕화면에 폴더를 하나 만들어주자
- 바탕화면에 폴더안에 frontend 라는 폴더 만들기
- 이제 VS Code 프로그램을 열고 frontend 파일안에 tags.html 파일 만들기
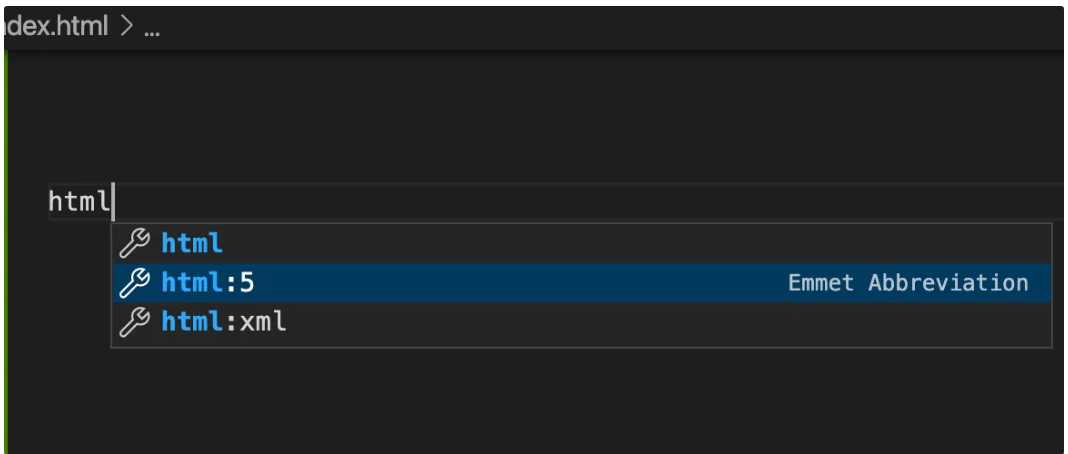
코드를 적는 공간에 html 이라고 적어보자

< > 가로들 사이에 글씨들을 자기 마음대로 바꿔가면서 무엇이 바뀌는지 알아보자 </>
<!DOCTYPE html>
<html lang="en">
<head>
<meta charset="UTF-8">
<meta name="viewport" content="width=device-width, initial-scale=1.0">
<title>스파르타코딩클럽 | HTML 기초</title>
</head>
<body>
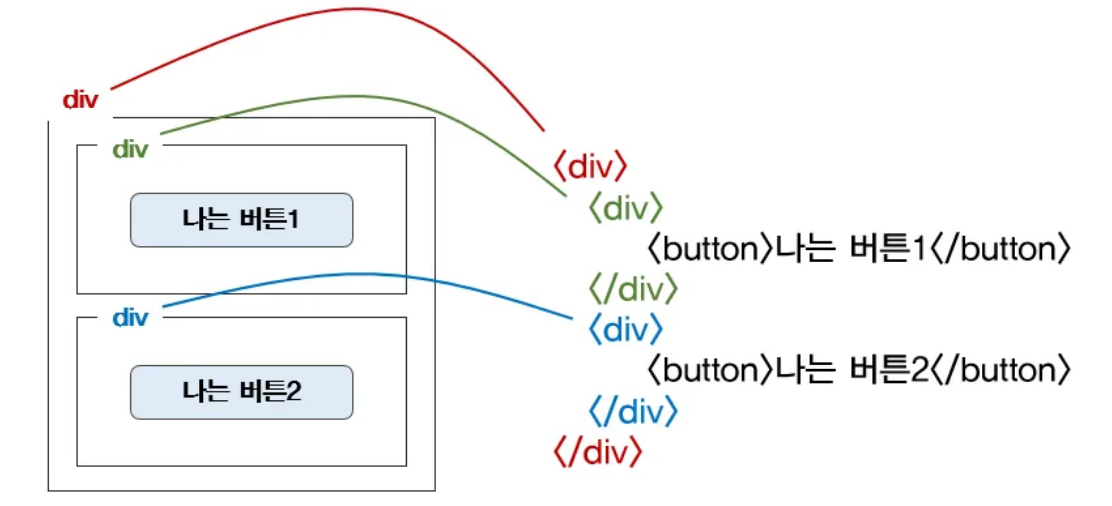
<!-- 구역을 나누는 태그들 -->
<div>나는 구역을 나누죠</div>
<p>나는 문단이에요</p>
<ul>
<li> bullet point!1 </li>
<li> bullet point!2 </li>
</ul>
<!-- 구역 내 콘텐츠 태그들 -->
<h1>h1은 제목을 나타내는 태그입니다. 페이지마다 하나씩 꼭 써주는 게 좋아요. 그래야 구글 검색이 잘 되거든요.</h1>
<h2>h2는 소제목입니다.</h2>
<h3>h3~h6도 각자의 역할이 있죠. 비중은 작지만..</h3>
<hr>
span 태그입니다: 특정 <span style="color:red">글자</span>를 꾸밀 때 써요
<hr>
a 태그입니다: <a href="http://naver.com/"> 하이퍼링크 </a>
<hr>
img 태그입니다: <img src="https://www.google.com/images/branding/googlelogo/1x/googlelogo_color_272x92dp.png" />
<hr>
input 태그입니다: <input type="text" />
<hr>
button 태그입니다: <button> 버튼입니다</button>
<hr>
textarea 태그입니다: <textarea>나는 무엇일까요?</textarea>
</body>
</html>
다른 곳에서 코드를 복사해 오다 보면 정렬이 맞지 않는 상황이 있을 수 있다.
그럴때는 shift + alt + f 를 눌러보자 자동으로 정렬을 해준다
5. 로그인 페이지 만들기
간단하게 로그인 페이지를 만들어 보자
<!DOCTYPE html>
<html lang="en">
<head>
<meta charset="UTF-8">
<title>로그인페이지</title>
</head>
<body>
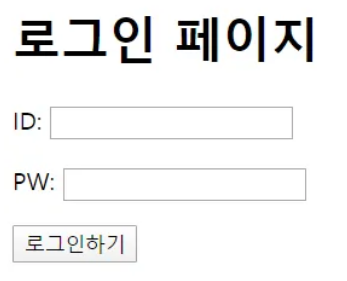
<h1>로그인 페이지</h1>
<p>ID: <input type="text"/></p>
<p>PW: <input type="text"/></p>
<button>로그인하기</button>
</body>
</html>6. CSS 기초
뼈대를 꾸미는 CSS 기초에 대해 알아보자
를 이용해서 로그인 창을 꾸며 보자
<!DOCTYPE html>
<html lang="en">

<head>
    <meta charset="UTF-8">
    <title>Document</title>
    <style>
        .mytitle {
            color: red;
            font-size: 40px;
        }

        .mybtn {
            font-size: 12px;
            color: white;
            background-color: green;
        }

        .mytxt {
            color: red;
        }
    </style>
</head>

<body>
    <h1 class="mytitle">로그인 페이지</h1>
    <p class="mytxt">ID: <input type="text" /></p>
    <p class="mytxt">PW: <input type="text" /></p>
    <button class="mybtn">로그인하기</button>
</body>

</html>
7. 자주 쓰는 CSS 1
자주 쓰이는 CSS 연습하기
* 꼭 기억해야할것 !
margin 과 padding
> margin은 바깥 여백을, padding 은 내 안쪽 여백을
> div에 색깔을 넣고, 직접 사용해서 차이를 비교해보자
이미지 URL
https://www.ancient-origins.net/sites/default/files/field/image/Agesilaus-II-cover.jpg<!DOCTYPE html>
<html lang="en">
<head>
<meta charset="UTF-8">
<meta name="viewport" content="width=device-width, initial-scale=1.0">
<title>Document</title>
<style>
.mytitle {
width:300px;
height:200px;
color: white;
text-align: center;
padding-top: 30px;
border-radius: 8px;
background-image: url('https://www.ancient-origins.net/sites/default/files/field/image/Agesilaus-II-cover.jpg');
background-position: center;
background-size: cover;
}
</style>
</head>
<body>
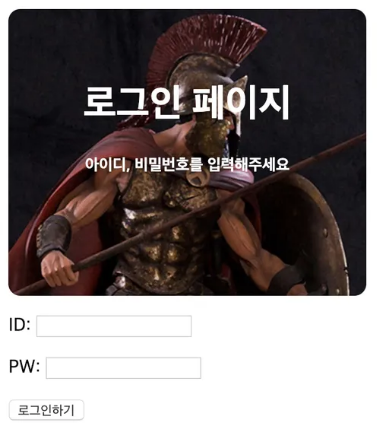
<div class="mytitle">
<h1>로그인 페이지</h1>
<h5>아이디, 비밀번호를 입력해주세요</h5>
</div>
<p>ID : <input type="text" /></p>
<p>PW : <input type="text" /></p>
<button>로그인하기</button>
</body>
</html>
8. 자주 쓰는 CSS 2
만들어둔 로그인 페이지를 가운데로 옮기고 싶다면?
* 박스 씌우고, 양쪽 여백 조정하기
즉, 전체 div를 만들고, width를 주고, margin: auto를 사용해보자
<!DOCTYPE html>
<html lang="en">

<head>
    <meta charset="UTF-8">
    <meta http-equiv="X-UA-Compatible" content="IE=edge">
    <meta name="viewport" content="width=device-width, initial-scale=1.0">
    <title>Document</title>
    <style>
        .mytitle {
            background-color: green;

            width: 300px;

            border-radius: 10px;
            color: white;

            text-align: center;

            padding: 30px 0px 0px 0px;

            background-image: url('https://www.ancient-origins.net/sites/default/files/field/image/Agesilaus-II-cover.jpg');
            background-position: center;
            background-size: cover;
        }
        .wrap {
            width: 300px;
            margin: 20px auto 0px auto;
        }
    </style>
</head>

<body>
    <div class="wrap">
        <div class="mytitle">
            <h1>로그인 페이지</h1>
            <h5>아이디, 비밀번호를 입력하세요</h5>
        </div>
        <p>ID : <input type="text" /></p>
        <p>PW : <input type="text" /></p>
        <button>로그인하기</button>
    </div>
</body>

</html>
9. [구글폰트] 잘 가져다 쓰기
구글 폰트 가져다가 쓰는 방법
- 크롬 브라우저에 google fonts로 검색
- filters를 통해서 language를 korean 으로 변경
- 나오는 폰트들중 자신이 원하는 폰트 선택
- 그리고 오른쪽 상단에 get font 버튼을 선택
- <> get embed code 버튼을 누르고 import 란을 클릭
- <style></style> 태그 코드를 복사
- CSS class 탭의 코드도 복사 붙여넣기
@import url('https://fonts.googleapis.com/css2?family=Gowun+Dodum&display=swap')
* {
	font-family: "Gowun Dodum", sans-serif;
}
10. [부트스트램] 잘 가져다 쓰기
부트스트랩이란?
예쁜 CSS를 미리 모아둔것!
해당코드를 <head> 안에 넣어두자
<link href="https://cdn.jsdelivr.net/npm/bootstrap@5.0.2/dist/css/bootstrap.min.css" rel="stylesheet"
        integrity="sha384-EVSTQN3/azprG1Anm3QDgpJLIm9Nao0Yz1ztcQTwFspd3yD65VohhpuuCOmLASjC" crossorigin="anonymous">
https://getbootstrap.com/docs/5.3/components/buttons/
11. [추억앨범] 프로젝트 1
지금 까지 배운 내용과 부트스트랩을 가지고 간단한 프로젝트 만들어보기

추억의 앨범 배경사진
https://images.unsplash.com/photo-1511992243105-2992b3fd0410?ixlib=rb-4.0.3&ixid=M3wxMjA3fDB8MHxwaG90by1wYWdlfHx8fGVufDB8fHx8fA%3D%3D&auto=format&fit=crop&w=1470&q=80
추억앨범 상단
<!doctype html>
<html lang="en">

<head>
    <meta charset="utf-8">
    <meta name="viewport" content="width=device-width, initial-scale=1, shrink-to-fit=no">

    <link href="https://cdn.jsdelivr.net/npm/bootstrap@5.0.2/dist/css/bootstrap.min.css" rel="stylesheet"
        integrity="sha384-EVSTQN3/azprG1Anm3QDgpJLIm9Nao0Yz1ztcQTwFspd3yD65VohhpuuCOmLASjC" crossorigin="anonymous">
    <script src="https://ajax.googleapis.com/ajax/libs/jquery/3.5.1/jquery.min.js"></script>
    <script src="https://cdn.jsdelivr.net/npm/bootstrap@5.0.2/dist/js/bootstrap.bundle.min.js"
        integrity="sha384-MrcW6ZMFYlzcLA8Nl+NtUVF0sA7MsXsP1UyJoMp4YLEuNSfAP+JcXn/tWtIaxVXM"
        crossorigin="anonymous"></script>

    <title>My Album</title>
    <style>
        @import url('https://fonts.googleapis.com/css2?family=Gowun+Dodum&display=swap');

        * {
            font-family: 'Gowun Dodum', sans-serif;
        }

        .mytitle {
            color: white;

            height: 250px;

            /* 내용물을 정렬 */
            display: flex;
            flex-direction: column;
            align-items: center;
            justify-content: center;

            background-image: url('https://images.unsplash.com/photo-1511992243105-2992b3fd0410?ixlib=rb-4.0.3&ixid=M3wxMjA3fDB8MHxwaG90by1wYWdlfHx8fGVufDB8fHx8fA%3D%3D&auto=format&fit=crop&w=1470&q=80');
            background-position: center;
            background-size: cover;
        }

        .mytitle > button {
            width: 150px;
            height: 50px;
            background-color: transparent;
            border: none;
            color: white;
            font-size: 18px;
            font-weight: bold;
            border-radius: 5px;

            border: 1px solid white;
            margin-top: 20px;
        }


    </style>
</head>

<body>
    <div class="mytitle">
        <h1>나만의 추억 앨범</h1>
        <button>추억 저장하기</button>
    </div>
</body>

</html>
12. [추억앨범] 프로젝트 1
포스팅 박스 만들기
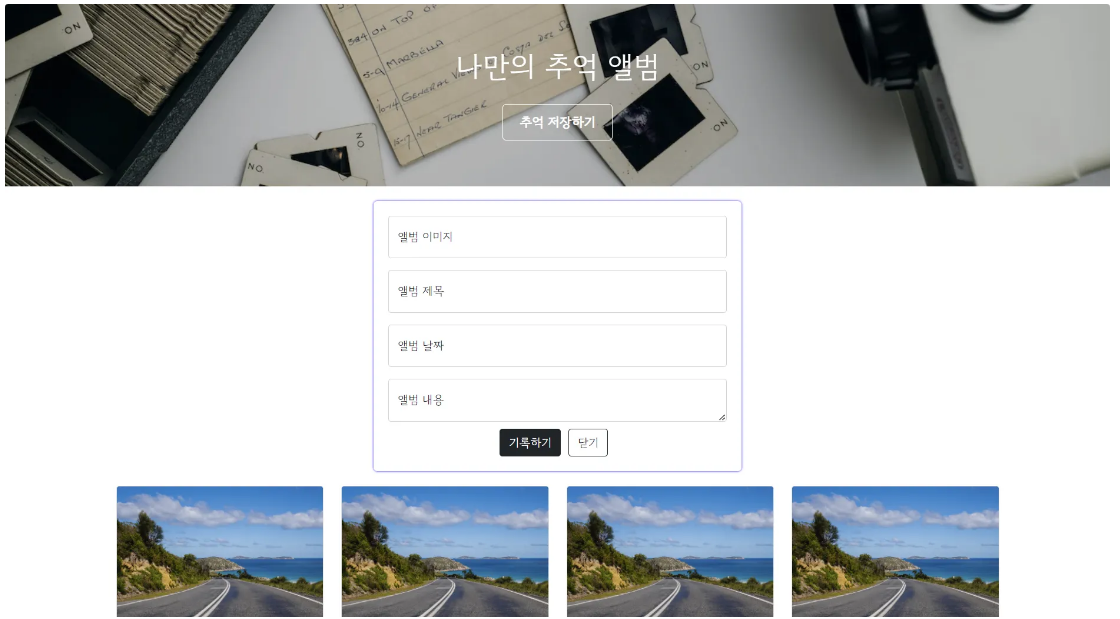
- 우선 큰 박스 먼저 만들기
- 그림자 효과 : box - shadow: 0px 0px 3px 0px blue; (위에서 부터 시계방향으로)
- 안쪽으로 띄우기 : padding: 20px
- 앨범 이미지, 앨범 제목, 앨범 날짜
- Forms 의 Floating Labels 참고
- 앨범 내용
- Forms 의 Floating Labels의 Textareas 참고
- 기록하기
- Buttons의 Variants 참고
<!doctype html>
<html lang="en">

<head>
    <meta charset="utf-8">
    <meta name="viewport" content="width=device-width, initial-scale=1, shrink-to-fit=no">

    <link href="https://cdn.jsdelivr.net/npm/bootstrap@5.0.2/dist/css/bootstrap.min.css" rel="stylesheet"
        integrity="sha384-EVSTQN3/azprG1Anm3QDgpJLIm9Nao0Yz1ztcQTwFspd3yD65VohhpuuCOmLASjC" crossorigin="anonymous">
    <script src="https://ajax.googleapis.com/ajax/libs/jquery/3.5.1/jquery.min.js"></script>
    <script src="https://cdn.jsdelivr.net/npm/bootstrap@5.0.2/dist/js/bootstrap.bundle.min.js"
        integrity="sha384-MrcW6ZMFYlzcLA8Nl+NtUVF0sA7MsXsP1UyJoMp4YLEuNSfAP+JcXn/tWtIaxVXM"
        crossorigin="anonymous"></script>

    <script src="https://code.jquery.com/jquery-3.2.1.slim.min.js"></script>
    <script src="https://cdnjs.cloudflare.com/ajax/libs/popper.js/1.12.9/umd/popper.min.js"></script>
    <script src="https://maxcdn.bootstrapcdn.com/bootstrap/4.0.0/js/bootstrap.min.js"></script>


    <title>My Album</title>
    <style>
        @import url('https://fonts.googleapis.com/css2?family=Gowun+Dodum&display=swap');

        * {
            font-family: 'Gowun Dodum', sans-serif;
        }

        .mytitle {
            background-color: green;
            color: white;

            height: 250px;

            /* 내용물을 정렬 */
            display: flex;
            flex-direction: column;
            align-items: center;
            justify-content: center;

            background-image: url('https://images.unsplash.com/photo-1511992243105-2992b3fd0410?ixlib=rb-4.0.3&ixid=M3wxMjA3fDB8MHxwaG90by1wYWdlfHx8fGVufDB8fHx8fA%3D%3D&auto=format&fit=crop&w=1470&q=80');
            background-position: center;
            background-size: cover;
        }

        .mytitle > button {
            width: 150px;
            height: 50px;
            background-color: transparent;
            border: none;
            color: white;
            font-size: 18px;
            font-weight: bold;
            border-radius: 5px;

            border: 1px solid white;
            margin-top: 20px;
        }

        .mycards {
            margin: 20px auto 20px auto;
            width: 1200px;
        }

        .mypostingbox {
            width: 500px;
            margin: 20px auto 20px auto;
            padding: 20px 20px 20px 20px;
            border-radius: 5px;
            box-shadow: 0px 0px 3px 0px blue;
        }

        .mybtn {
            display: flex;
            flex-direction: row;
            align-items: center;
            justify-content: center;

            margin-top: 10px;
        }

        .mybtn>button {
            margin-right: 10px;
        }
    </style>
</head>

<body>
    <div class="mytitle">
        <h1>나만의 추억 앨범</h1>
        <button>추억 저장하기</button>
    </div>

    <div class="mypostingbox">

        <div class="form-floating mb-3">
            <input type="email" class="form-control" id="floatingInput" placeholder="name@example.com">
            <label for="floatingInput">앨범 이미지</label>
        </div>

        <div class="form-floating mb-3">
            <input type="email" class="form-control" id="floatingInput" placeholder="name@example.com">
            <label for="floatingInput">앨범 제목</label>
        </div>

        <div class="form-floating mb-3">
            <input type="email" class="form-control" id="floatingInput" placeholder="name@example.com">
            <label for="floatingInput">앨범 날짜</label>
        </div>

        <div class="form-floating">
            <textarea class="form-control" placeholder="Leave a comment here" id="floatingTextarea"></textarea>
            <label for="floatingTextarea">앨범 내용</label>
        </div>

        <div class="mybtn">
            <button type="button" class="btn btn-dark">기록하기</button>
            <button type="button" class="btn btn-outline-dark">닫기</button>
        </div>
    </div>

    <div class="mycards">
        <div class="row row-cols-1 row-cols-md-4 g-4">
            <div class="col">
                <div class="card h-100">
                    <img src="https://images.unsplash.com/photo-1446768500601-ac47e5ec3719?ixlib=rb-4.0.3&ixid=M3wxMjA3fDB8MHxwaG90by1wYWdlfHx8fGVufDB8fHx8fA%3D%3D&auto=format&fit=crop&w=1446&q=80"
                        class="card-img-top" alt="...">
                    <div class="card-body">
                        <h5 class="card-title">앨범 제목</h5>
                        <p class="card-text">앨범 내용</p>
                    </div>
                    <div class="card-footer">
                        <small class="text-muted">앨범 날짜</small>
                    </div>
                </div>
            </div>
        </div>
    </div>


</body>

</html>

'부트캠프' 카테고리의 다른 글
| 웹 개발 강의 정리 3 (0) | 2025.03.24 |
|---|---|
| 웹 개발 강의 정리 2 (0) | 2025.03.21 |
| SQL 오늘 배운 강의 정리 5 (완) (0) | 2025.03.20 |
| SQL 오늘 배운 강의 정리 4 (0) | 2025.03.19 |
| SQL 오늘 강의 내용 정리 3 (0) | 2025.03.19 |